Stripe Payment Gateway Integration using PHP
The market offers a wide variety of payment services such as PayPal, Stripe, Sage Pay, CCAvenue, and others as examples. A payment gateway must be included into the application.
All offer API so that users may access payment services through a gateway. Among the possibilities, Stripe is one of the most popular payment gateways. It is well known for facilitating simple credit and debit card transactions.
We may enable payment alternatives in an application by integrating payment gateway API. Since actual money is at stake, we must pick a well-known payment service with a solid reputation. It is for obtaining reliable expert assistance. The best solution for assured transactions is Stripe.
Integrating the Stripe payment gateway: steps by step process
Step 1: Create an account with Stripe and obtain API credentials.

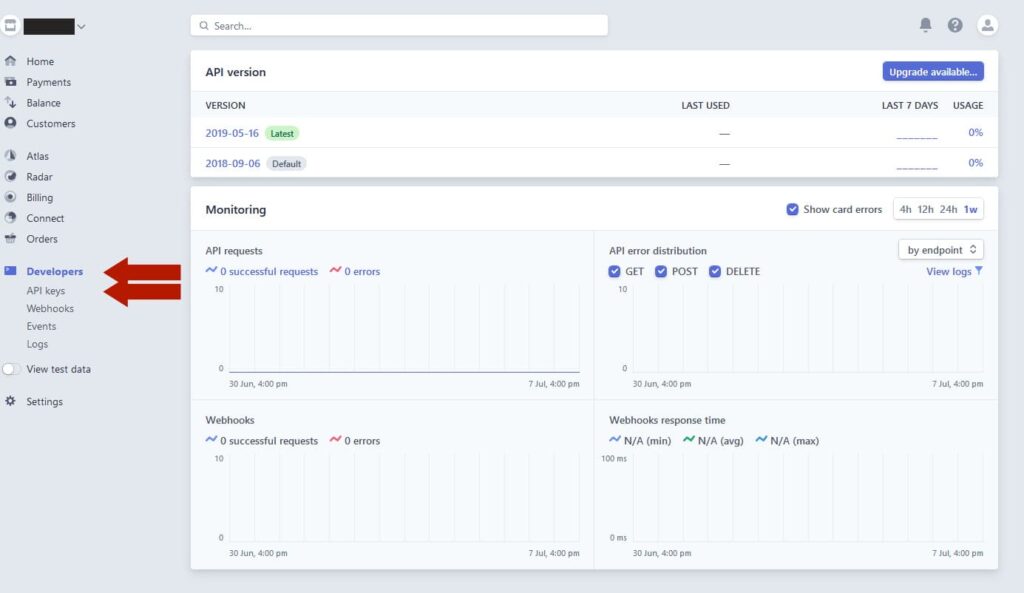
Sign up for a Stripe account and access the dashboard. To obtain the API keys, navigate to Developers -> API keys. Secret keys and publishable keys are the two types of standard API keys. By default, the secret key will be hidden and must be expressly unmasked by pressing the expose key token control button. These keys are kept as PHP constants in a configuration file and will be utilized later in the Stripe payment code.
Step 2: To obtain the user’s credit card information, create a payment form and render the Stripe element.

Step 3: Add This HTML Code
Use Below Code To Create The Form
<form action="process.php" method="POST" id="paymentForm">
    <div class="form-group">
        <label for="name">Name</label>
        <input type="text" name="custName" class="form-control">
    </div>
    <div class="form-group">
        <label for="email">Email</label>
        <input type="email" name="custEmail" class="form-control">
    </div>
    <div class="form-group">
        <label>Card Number</label>
        <input type="text" name="cardNumber" size="20" autocomplete="off" id="cardNumber" class="form-control" />
    </div>
    <div class="row">
    <div class="col-xs-4">
    <div class="form-group">
        <label>CVC</label>
        <input type="text" name="cardCVC" size="4" autocomplete="off" id="cardCVC" class="form-control" />
    </div>
    </div>
    </div>
    <div class="row">
    <div class="col-xs-10">
    <div class="form-group">
        <label>Expiration (MM/YYYY)</label>
        <div class="col-xs-6">
            <input type="text" name="cardExpMonth" placeholder="MM" size="2" id="cardExpMonth" class="form-control" />
        </div>
        <div class="col-xs-6">
            <input type="text" name="cardExpYear" placeholder="YYYY" size="4" id="cardExpYear" class="form-control" />
        </div>
    </div>
    </div>
    </div>
    <br>
    <div class="form-group">
        <input type="submit" id="makePayment" class="btn btn-success" value="Make Payment">
    </div>
</form>
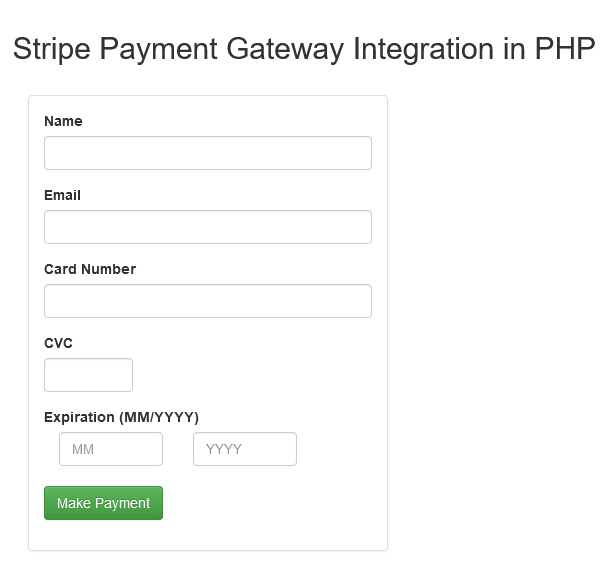
To collect user input, this HTML form has fields such as cardholder’s name, card number, CVC, and expiration month/year. For the credit card validator example, we previously generated a form with these fields. As hidden inputs, it also contains the item number, item name, quantity, and currency code.
When testing the Payment integration, Stripe API advises utilising tokens rather than providing test card information. Using the Stripe JavaScript library, the test tokens are mapped to the tokenized credit card information.
Step 4: Add Stripe Library file in header
<script type="text/javascript" src="https://js.stripe.com/v2/"></script>
Step 5: Create custom payment.js to get Token from Stripe to securely create, confirm, and authenticate card payments and add in the header area.
<script type="text/javascript" src="payment.js"></script>
// set your stripe publishable key
Stripe.setPublishableKey('Your_API_Publishable_Key');
$(document).ready(function() {
    $("#paymentForm").submit(function(event) {
        $('#makePayment').attr("disabled", "disabled");
        // create stripe token to make payment
        Stripe.createToken({
            number: $('#cardNumber').val(),
            cvc: $('#cardCVC').val(),
            exp_month: $('#cardExpMonth').val(),
            exp_year: $('#cardExpYear').val()
        }, handleStripeResponse);
        return false;
    });
});
// handle the response from stripe
function handleStripeResponse(status, response) {
	console.log(JSON.stringify(response));
    if (response.error) {
        $('#makePayment').removeAttr("disabled");
        $(".paymentErrors").html(response.error.message);
    } else {
		var payForm = $("#paymentForm");
        //get stripe token id from response
        var stripeToken = response['id'];
        //set the token into the form hidden input to make payment
        payForm.append("<input type='hidden' name='stripeToken' value='" + stripeToken + "' />");
		payForm.get(0).submit();
    }
}
The input information will be verified on the client-side after the card details have been submitted. The card information will be submitted to the Stripe server to obtain a token after the validation returns true. The token will be returned by the Stripe API and inserted to the fields on the payment form by making use of the Stripe ResponseHandler. The Stripe payment system’s most inviting feature handles card data and validation with the Stripe server using JavaScript.
The form will be sent programmatically using Javascript when the token has been inserted. We learned how to submit the payment request using JavaScript when creating Sage Pay payment integration.
Step 6: Handle Stripe payment requests using PHP
The Stripe PHP library must be downloaded in order to process payments using PHP code. A PHP class called StripePayment.php was built to house the payment-related functionality. By submitting the API token and additional purchase request data, such as the customer id, amount, currency, and more, it executes the Stripe charges. The Stripe API will deliver the payment answer as a JSON object after handling the payment request.
<?php
//check if stripe token exist to proceed with payment
if(!empty($_POST['stripeToken'])){
    // get token and user details
    $stripeToken  = $_POST['stripeToken'];
    $custName = $_POST['custName'];
    $custEmail = $_POST['custEmail'];
    $cardNumber = $_POST['cardNumber'];
    $cardCVC = $_POST['cardCVC'];
    $cardExpMonth = $_POST['cardExpMonth'];
    $cardExpYear = $_POST['cardExpYear'];
    //include Stripe PHP library
    require_once('stripe-php/init.php');
    //set stripe secret key and publishable key
    $stripe = array(
      "secret_key"      => "Your_Stripe_API_Secret_Key",
      "publishable_key" => "Your_API_Publishable_Key"
    );
    \Stripe\Stripe::setApiKey($stripe['secret_key']);
    //add customer to stripe
    $customer = \Stripe\Customer::create(array(
        'email' => $custEmail,
        'source'  => $stripeToken
    ));
    // item details for which payment made
    $itemName = "phpcodenmore test item";
    $itemNumber = "CODE987654321";
    $itemPrice = 50;
    $currency = "usd";
    $orderID = "SKA987654321";
    // details for which payment performed
    $payDetails = \Stripe\Charge::create(array(
        'customer' => $customer->id,
        'amount'   => $itemPrice,
        'currency' => $currency,
        'description' => $itemName,
        'metadata' => array(
            'order_id' => $orderID
        )
    ));
    // get payment details
    $paymenyResponse = $payDetails->jsonSerialize();
    // check whether the payment is successful
    if($paymenyResponse['amount_refunded'] == 0 && empty($paymenyResponse['failure_code']) && $paymenyResponse['paid'] == 1 && $paymenyResponse['captured'] == 1){
        // transaction details
        $amountPaid = $paymenyResponse['amount'];
        $balanceTransaction = $paymenyResponse['balance_transaction'];
        $paidCurrency = $paymenyResponse['currency'];
        $paymentStatus = $paymenyResponse['status'];
        $paymentDate = date("Y-m-d H:i:s");
        //insert tansaction details into database
		include_once("db_connect.php");
        $insertTransactionSQL = "INSERT INTO transaction(cust_name, cust_email, card_number, card_cvc, card_exp_month, card_exp_year,item_name, item_number, item_price, item_price_currency, paid_amount, paid_amount_currency, txn_id, payment_status, created, modified)
		VALUES('".$custName."','".$custEmail."','".$cardNumber."','".$cardCVC."','".$cardExpMonth."','".$cardExpYear."','".$itemName."','".$itemNumber."','".$itemPrice."','".$paidCurrency."','".$amountPaid."','".$paidCurrency."','".$balanceTransaction."','".$paymentStatus."','".$paymentDate."','".$paymentDate."')";
		mysqli_query($conn, $insertTransactionSQL) or die("database error: ". mysqli_error($conn));
        $lastInsertId = mysqli_insert_id($conn);
       //if order inserted successfully
       if($lastInsertId && $paymentStatus == 'succeeded'){
            $paymentMessage = "<strong>The payment was successful.</strong><strong> Order ID: {$lastInsertId}</strong>";
       } else{
          $paymentMessage = "Payment failed!";
       }
    } else{
        $paymentMessage = "Payment failed!";
    }
} else{
    $paymentMessage = "Payment failed!";
}
echo $paymentMessage;
?>
Step 7: Create and set up a webhook to get response notifications.
Go to the dashboard’s Stripe Developers->Webhook menu. Then establish a webhook endpoint URL to tell the application when a payment event occurs.
It will be necessary to map events for the webhook endpoint in the webhook creation window.
1. payment intent.succeeded
2. payment intent.payment failed
Configure the webhook endpoint in the application after generating it in the dashboard. It may be used to dynamically check the endpoint while making API requests.
Step 8: Disassemble the payment response object and save it to a database.
To determine the payment status and response, the serialised JSON object is processed. Using MySQL insert, information such as email, item number, item name, payment status, and response is placed in the tbl payment database. For managing the database activities, I utilised MySQLi and prepared statements.
Step 9: The Stripe Payment Gateway for testing
The documentation for testing the Stripe API include extra test data. The test card numbers can be used to show how Stripe payment integration works.
It is to be noted that we must test Stripe payment in test data mode before going live. Toggling the data mode will make it simple to go live once we have confirmed that everything is functioning properly in test mode.
Conclusion
The simplest way to take credit card payments on a web application is using the Stripe payment gateway. To establish a charge and process payment using a credit/debit card, our sample code makes use of the Stripe PHP package. This Stripe integration script is prepared for SCA thanks to the incorporation of 3D Secure authentication (Strong Customer Authentication).


